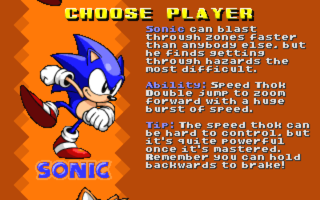
Character select

The Character Select (or "Choose Player") screen is where the character to start a new Single Player game with is chosen. By default, there are four options to choose from: Sonic, Tails, Knuckles, and Sonic & Tails. The last of these starts the game with Sonic but adds a Tails bot as a secondary player, similarly to Sonic 2 and Sonic 3.
Custom character select entries can be created via SOC, which will be displayed at this screen if they are enabled (see Status) – custom character select entries are usually provided with custom characters, but can also make use of characters already loaded in the game (or a combination of them).
Note that if the first level on starting a new Single Player game uses the level header parameter ForceCharacter, the Character Select screen will automatically be skipped.
Example
This is a re-creation of Sonic's character select entry attributes, which would create a new character select entry identical to Sonic's in the Character Select screen, located at the bottom of the list:
Character
SkinName = sonic
DisplayName = Sonic
PlayerText = ^4Sonic^0 can blast through zones faster than anybody else, but he finds getting through hazards the most difficult.

^4Ability:^0 Speed Thok
Double jump to zoom forward with a huge burst of speed.

^4Tip:^0 The speed thok can be hard to control, but it's quite powerful once it's mastered. Remember you can hold backwards to brake!
#
Header
The block for the character select entry is started with a header that simply reads Character. No number must be supplied for the character select entry; SRB2 will find an unused slot automatically. However, when editing an already existing character select entry, the slot number must be supplied. For example, to edit Sonic's character select entry, the header must be Character 1.
- Example:
Character
Parameters
Status
This parameter determines whether the character select entry is displayed (1) or not (0). When adding an entry for a new character, this parameter can be left out since it defaults to 1. Setting it to 0 is useful for removing SRB2's own characters from the Character Select screen, or to recreate them with new text: To disable Sonic's entry, for example, you can add a block with the header Character 1 and Status = 0 as the only parameter, while to edit Sonic's entry, you first have to disable it, then reenable it with the new details as a separate block.
- Example:
Status = 1
SkinName
This is used to determine the character to start the game with when the character select entry is chosen – this should be the same as the name value in the desired character's S_SKIN.
- Example:
SkinName = metalsonic
SkinName also provides the option to start the game with a bot as a secondary character that follows the player's character around. To do this, the & symbol must follow the S_SKIN name of the player's character, followed by the S_SKIN name of the bot's character; the result will have a format of "player&bot", player being the player character's name and bot being the bot character's name.
- Example:
SkinName = sonic&tails
DisplayName
This is the character's name to display below their portrait image. Usually, this should match the realname value in the desired character's S_SKIN, unless the entry consists of a player character with a bot character. Use the # character to separate the name into two lines if it's too long.
- Example:
DisplayName = Sonic#& Tails
PicName
This is the lump name of the image that will be associated with the character select entry. This should only be used if this picture is intended to be different from the one specified in the character's S_SKIN, as by default the character select picture used will be set by the XTRA spriteset's second graphic in the character.
This image must be exactly 128×128 pixels in size, or 256×256 for high resolution. This value is case-sensitive; usually, it will be in all capitals, since lump names are typically in all capitals.
- Example:
PicName = EGGMPICS
TagTextColor
This determines the color of the name tag font. If not set, this matches the character's default color.
- Example:
TagTextColor = SKINCOLOR_BLUE
TagOutlineColor
This determines the color of the name tag's outline. If not set, this matches the character's default opposite color.
- Example:
TagOutlineColor = SKINCOLOR_ORANGE
OppositeColor
This determines the color of the character select's background when this character is in focus. If not set, this matches the character's default opposite color.
- Example:
OppositeColor = SKINCOLOR_ORANGE
NameTag
If this parameter is set, the normal character's name tag will be replaced by the chosen graphic lump. This value is case-sensitive.
- Example:
NameTag = CHRTAG
PlayerText
This determines the description text that will be displayed for the character select entry when it is highlighted. The text will automatically wrap and a large space is available. This attribute string is ended by the # character. Custom color codes may also be used.
- Example:
PlayerText = ^4Sonic^0 can blast through zones faster than anybody else, but he finds getting through hazards the most difficult.

^4Ability:^0 Speed Thok
Double jump to zoom forward with a huge burst of speed.

^4Tip:^0 The speed thok can be hard to control, but it's quite powerful once it's mastered. Remember you can hold backwards to brake!
#
External links
| SOC | [view] | |
| General | Clear • MainCfg
| |
| Objects | Object • State • Sound • Sprite2 • SpriteInfo • Sprite2Info • Freeslot
| |
| Unlockable content | Emblem • ExtraEmblem • Unlockable • ConditionSet
| |
| Miscellaneous | Wipes • Character • Level • Cutscene / Scene • Prompt • Menu • HudItem
| |
| Related links | Actions • Constants • Custom Object tutorial | |
