Custom character tutorial/Sprites
| Custom character tutorial | [view] | |
|
Chapter 1: Overview • Chapter 2: S_SKIN • Chapter 3: Sprites • Chapter 4: Character select | ||
A custom character consists of a series of sprites that make up the visual design of the character itself in-game. Through an abridged naming system for sprites, it is possible to create a complete character with only around 177 sprites on average. This chapter gives an overview of how a character's sprites are created and added to the character's WAD or PK3 file. Note that this tutorial only covers the technical aspects of sprite creation; it will not teach you how to make good sprites.
Creating sprites
Spriting a character is the hardest and most tedious task that you will face when creating a custom character for SRB2. It is also a very time-consuming process – it is not uncommon for this part of creating your character to take months to complete.
Recommended programs
The following is a selection of graphics editing programs available that you can use to create your character's sprites with:
- Paint.NET: A freeware graphics editor. Not available for Linux or macOS.
- GIMP: A free and open-source graphics editing program that is supported on Linux, macOS and Windows.
- Aseprite: An animated sprite editor and pixel art tool. A free trial version is available for download, but files cannot be saved with it; you will have to pay for the full version or compile it in order to use it.
- Libresprite: A free, open-source fork of Aseprite, based on an earlier version which was freely licensed.
- GraphicsGale: A freeware graphics editor, specially designed for creating sprites and pixel art.
- Microsoft Paint: A simple graphics editing program that is included with all versions of Windows.
- Photoshop: A multi-purpose graphics editing software. Requires an Adobe Creative Cloud subscription.
Technical information

The usual dimensions (image size) of a sprite for a character are 70×70 pixels, with the actual character size being roughly 40×63 (Sonic's size).
To allow your character to switch skin colors, the parts of your character that you want to change color in each sprite should all use a specific range of colors in the palette. This should be a range of colors that aren't used by body parts or clothes that you don't want to change color, and one that allows your character to look correct in the skin color you want your character to use in Single Player (as well as in other skin colors, if possible).
For instance, the main color of all of Sonic, Tails' and Knuckles' sprites is green (or palette colors #96 through #111) rather than blue, orange or red, respectively. This green range is also the one most commonly used by custom characters, as it is considered the easiest color range to work with. If you don't want your character to use this range of colors, use the startcolor parameter in the character's S_SKIN lump to choose a different range of colors to work with. Note that this will always be a range of 16 colors, with startcolor determining the first color in the range.
The prefcolor parameter is then used to determine the default skin color used by your character in Single Player. Ideally, you should test out how your character's sprites appear in this skin color for best results. Refer to the previous chapter of the tutorial for more details on setting up your character's skin color in the S_SKIN lump.
Keep in mind that the actual size of the sprite file does not matter, as the sprite offsets can be modified in your chosen lump editor. What actually matters is the size of the character minus the transparent pixels.
Importing sprites
Once you have created your character's sprites (or at least a portion of them), you now need to add them to the WAD or PK3 file containing your character's lumps. This section explains how to import your sprites and how to name the lumps within the WAD or PK3 file.
SLADE
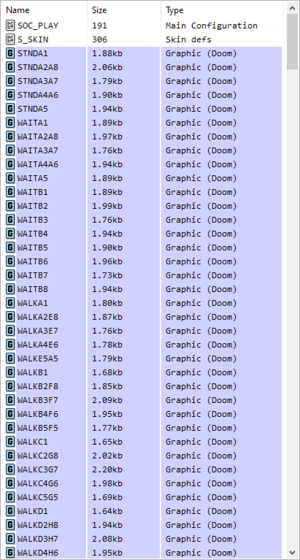
S_SKIN lump and the sprites should appear in a WAD file's lump list. Click to view an enlarged version of the image.To import the images for your character in a blank WAD or PK3 file, click Archive → Import Files in the menu bar, browse to the folder where your images are located, select them and hit enter. If you are importing sprites into a file already containing placeholder sprites, you can alternatively replace them directly one-by-one by clicking Entry → Import; this will directly replace the lump for the old sprite with your imported sprite.
If your sprites are drawn on a colored background you will need to remove the background. This can be done with the "Convert Graphic" tool. Select all imported lumps at once, right-click on them, and select "Gfx" → "Convert to..." The conversion window will pop up. You may select either "Doom Gfx (Paletted)" or "PNG (Truecolor)" as the format to convert to and make sure SRB2's palette (which should be "Existing/Global" if you have set up srb2.pk3 as your Base Resource, otherwise use "Sonic Robo Blast 2") is selected. Select "Enable Transparency" and choose "Transparent Color:". If you are using a color other than cyan as the background colour, you will need to click on the colored square to enter the desired background color. Press Convert All to process all the images at once.
If it is necessary to rename the lumps to follow the sprite naming format, right-click on them and click Rename Entry. If multiple sprite lumps are being renamed at once, the text characters that differ between them will be given as asterisks (*) in the "Rename" window that pops up. For instance, PLAYA1 and PLAYA5 will appear as PLAYA*; lump selections such as PLAYA1 and PLAYA2A8 will appear as PLAYA*** in the "Rename" window. Note: From SLADE v3.1.1 onwards, sprites for the ^ frame cannot be mass-renamed, as SLADE uses carets (^) as part of its extra formatting features for renaming multiple sprite lumps at once. These sprites must be renamed individually instead.
If your S_SKIN lump is not already present in your WAD or PK3 file, but is ready to be added at this stage, you can import it here too – click Entry → Move Up (shortcut: Ctrl+U) to push up the position of the S_SKIN lump until it is immediately above the first sprite.
XWE
In order to import your character's sprites into the WAD or PK3 file, you need to set up XWE to use SRB2's palette if you haven't already. If you don't do this, the images will be converted into the standard Doom palette, which is different from SRB2's palette, and their colors will be messed up as a result. This article explains how to set up the palette in XWE.
To import the images for your character in a blank WAD or PK3, Click Entry → Load in the menu bar, browse to the folder where your images are located, select them and hit enter. If you are importing sprites into a file already containing placeholder sprites, you can alternatively replace them directly one-by-one by clicking Entry → Replace; this will directly replace the lump for the old sprite with your imported sprite.
Unlike SLADE, XWE will automatically convert the images into the Doom Graphics Format, and will automatically convert all cyan pixels in them into transparent pixels as soon as the images are loaded into the file.
If it is necessary to rename the lumps to follow the sprite naming format, right-click on them and click Rename Entry. If multiple sprite lumps are being renamed at once, the text characters that differ between them will be given as asterisks (*) in the "Rename" window that pops up. For instance, PLAYA1 and PLAYA5 will appear as PLAYA*; lump selections such as PLAYA1 and PLAYA2A8 will appear as PLAYA*** in the "Rename" window.
If your S_SKIN lump is not already present in your WAD or PK3 file, but is ready to be added at this stage, you can import it here too – click Entry → Move Up (shortcut: Ctrl+U) to push up the position of the S_SKIN lump until it is immediately above the first sprite.
Naming format
- See also: Sprite > Format
As with all sprites, character sprites must have a lump name of the format SNAMXx. How this format is used slightly differs for character sprites, however:
SNAMis a prefix corresponding to the name of the stance that the player is currently in, i.eSTNDfor standing orROLLfor rolling.Xdesignates the frame that a sprite belongs to; see the Frame list below for determining which frames to place your sprites in for each animation for the character.xdesignates a sprite's rotation. It is a number between 1 and 8, starting with the front view at 1 and then continuing clockwise – for example, 2 is the diagonal front-left view, 5 is the back view and 8 is the diagonal front-right view.
As with normal sprites, the condensed naming system can be used to condense 8 rotations into five sprites instead of eight. For example, the standing frame of the player would consist of the following five sprites:
SNAMA1
SNAMA2A8
SNAMA3A7
SNAMA4A6
SNAMA5
However, if the frame has non-symmetrical features, using the condensed naming system will cause these features to be flipped as well. For example, if the character carried a weapon on their right hand, it would also appear on their left hand by error when the game flips the sprite, as if they were "switching hands". This problem is solved by falling back into the uncondensed naming structure for any frames where this problem occurs, i.e., SNAMA1 through SNAMA8 as eight separate sprites.
If your character appears the same from all angles for a particular frame, a single sprite can be used with a rotation of 0 (e.g., SNAMA0) – this means the game will use the sprite for all 8 rotations in the frame. This trick is generally used only for frames used by super transformation, death, and the Level End Sign/Extra Life Monitor icons.
| To do Update graphics for 2.2.14 |
Frame list
This is the full list of sprite frames that exist for all characters in SRB2. Note that you do not need to give a character all of these frames, only the frames that would be applicable to their abilities.
|
There are also sprite frames that none of the default characters use, instead using other frames in their place. These animations are listed below:
| Frame prefix | Usage |
|---|---|
| FRUN | CA_FLOAT when moving at running speed |
| NATK | Attacking the Ideya Capture |
| NSTD | Standing on the ground while in NiGHTS mode |
| JUMP | Jumping. If not present, uses spin frames if the character can spin, otherwise uses spring frames. Note that the animation switches to FALL frames when the player starts falling. |
In order to create sprites for the super form, put them under a S_SUPER marker and give them the same prefixes.
| Note Alternatively, if you're using PK3s, you can place these sprites inside folders located in your character's sprite folder. This will help solve the issue of SLADE v3.2+ not allowing duplicate sprite names in zip files. |
The super transformation animation is paced assuming the TRNS sprite prefix has seven frames, which should be kept in mind. The XTRA sprite prefix requires six frames, although placeholder graphics will be used if these aren't provided.
1 To figure out the correct sprite offsets for these frames, you can refer to the offsets of the Level End Sign/Extra Life Monitor sprites, as well any existing character's own sprite offsets for these frames.
If you want to create a new sprite,do it before placing it in the freeslot to add sprites!
| Custom character tutorial | [view] | |
|
Chapter 1: Overview • Chapter 2: S_SKIN • Chapter 3: Sprites • Chapter 4: Character select | ||
