Development mode

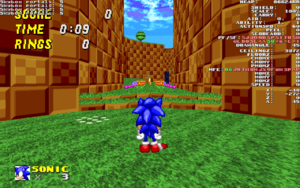
devmode 4095, the full version of development mode.Development mode (commonly referred to as devmode, after the console command that activates it) is a special mode, exclusive to Single Player, used for testing and development of levels in SRB2. It prints debug information into the console and displays many internal attributes of the game on the HUD. Additionally, it allows skin and color changes in Single Player and unlocks several console commands and variables that would be considered cheating in a regular game, such as setting the player's lives or changing the character's abilities. Because of this, enabling development mode activates the cheat protection, disallowing any secrets to be unlocked for the rest of the SRB2 session. Development mode cannot be activated in netgames.
Feature flags
Development mode's features are split into twelve parts. Each part has its own set of debug messages and/or HUD attributes for debugging a particular feature or component of the game, and is enabled by toggling on the corresponding flag. The values of multiple flags can be added together for a particular combination of features. Either the decimal or hexadecimal values can be used with the devmode command – e.g. devmode 4095 (or devmode 0xFFF) will turn all of development mode's features on, and devmode 0 will turn all of them off.
| Decimal | Hexadecimal | Flag name | Description |
|---|---|---|---|
| 1 | 0x01
|
Basic | Displays basic information on the HUD, such as the player's map coordinates and angle. |
| 2 | 0x02
|
Detailed | Displays more detailed information on the HUD, mostly related to the player object — for instance, the object's momentum, floor and ceiling heights, and eflags.
|
| 4 | 0x04
|
Player | Displays information on the HUD, mostly related to the player struct itself — this includes player powers, player flags, and other attributes. |
| 8 | 0x08
|
Render | Prints rendering-related debugging messages into the console. |
| 16 | 0x10
|
NiGHTS Basic | Displays basic information for NiGHTS mode on the HUD, such as timers for power-ups, links and bumpers, amount left in the drill meter, and displaying milliseconds as well as seconds for the time left as NiGHTS. Also prints messages into the console signaling when the Ideya Drone displays the "GOAL" sign or not. |
| 32 | 0x20
|
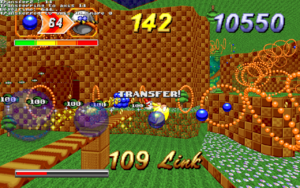
NiGHTS | When playing as NiGHTS Super Sonic, axis transfers are displayed in-game as a rail ring sparkle trail stretching outwards from the point of the axis transfer and at the height of the player. When the player is transferred to another axis, "TRANSFER!" is displayed in the center of the screen. Also prints information on mares, axes and axis transfers into the console. |
| 64 | 0x40
|
PolyObj | Prints PolyObject-related debugging messages into the console. |
| 128 | 0x80
|
Gamelogic | Prints miscellaneous debugging messages related to game logic into the console. This includes messages relating to actions. |
| 256 | 0x100
|
Netplay | Prints netplay-related debugging messages into the console. |
| 512 | 0x200
|
Memory | Prints memory-related debugging messages into the console. Also displays the amount of heap memory used on the HUD. |
| 1024 | 0x400
|
Setup | Prints setup/initialization-related debugging messages into the console. This includes information for level-loading, loading files into the game, loading ghosts for Record Attack, MD5 computing, etc. |
| 2048 | 0x800
|
Lua | Prints Lua-related debugging messages into the console. |
| 4096 | 0x1000
|
Randomizer | Displays information for random seeds on the HUD. |
| 8192 | 0x2000
|
Viewmorph | When using the Software renderer, displays the gridlines used to calculate the rotation by the player's viewrollangle.
|
Console commands requiring development mode
A number of console commands/variables require development mode to be enabled to function, because they modify gameplay in a way that could be considered cheating. Due to this, they cannot be used in netgames (with the exception of ringslinger). These commands/variables include:
Commands
charabilitycharspeedgetallemeralds*gravfliphurtmejumptoaxis-noresetplayersparameter of themapcommandresetemeralds*rteleportsavecheckpointscalesetcontinues*setlives*setrings*teleportskynumweather
Variables
gravity*ringslinger*
* If Pandora's Box has been unlocked, these console commands/variables will be available regardless of whether development mode is turned on or not.
Attributes
When some of development mode's feature flags are turned on, the values of certain game attributes are displayed on the HUD. This section lists the attributes displayed by enabling particular flags.
Basic
- X: Shows the X-axis position in fracunits of the player on the map.
- Y: Shows the Y-axis position in fracunits of the player on the map.
- Z: Shows the Z-axis position (height) in fracunits of the player on the map.
- A: Shows the yaw angle that the player is facing on the map in degrees, going counter-clockwise relative to East (0). It does not translate the same way as hoops.
Detailed
- CEILZ: Shows the ceiling height in fracunits of the lowest tangible ceiling above the player's head.
- FLOORZ: Shows the floor height in fracunits of the highest tangible floor below the player's feet.
- CMOMX: Shows the X-axis momentum of the player produced by a conveyor belt or wind/current.
- CMOMY: Shows the Y-axis momentum of the player produced by a conveyor belt or wind/current.
- PMOMZ: Shows the Z-axis momentum of the player produced by a moving platform the player is standing on.
- MFE: Shows which of the player object's
eflagsare currently turned on. Each flag is represented with a piece of colored text that turns green when on and red when off:- OG:
MFE_ONGROUND - JH:
MFE_JUSTHITFLOOR - TW:
MFE_TOUCHWATER - UW:
MFE_UNDERWATER - JS:
MFE_JUSTSTEPPEDDOWN - VF:
MFE_VERTICALFLIP - GW:
MFE_GOOWATER - SP:
MFE_SPRUNG - AP:
MFE_APPLYPMOMZ
- OG:
- MOMX: Shows the X-axis momentum of the player not from a conveyor belt or wind/current.
- MOMY: Shows the Y-axis momentum of the player not from a conveyor belt or wind/current.
- MOMZ: Shows the Z-axis momentum of the player.
- SPEED: Shows the combined X-axis and Y-axis momentum of the player.
Player
- SHIELD: Shows the current value of
pw_shieldfor the player, in hexadecimal form:
| Value (Hex) | Shield/other details |
|---|---|
| 0 | No shield |
| 1 | Pity Shield |
| 2 | Whirlwind Shield |
| 3 | Armageddon Shield |
| 100-1FF | Force Shield (100 + no. of extra hits before losing shield; 100 = 1 hit left, 1FF = 256 hits left) |
| 200 | Fire Flower power-up (value can be combined with values for all other shields including Force) |
| 401 | Flame Shield |
| 801 | Bubble Shield |
| C01 | Elemental Shield |
| 1001 | Attraction Shield |
| 1002 | Lightning Shield |
- SCALE: Shows the player's current scale as a percentage of the normal scale (normal scale is 100%, small scales are < 100%, and large scales are > 100%).
- CARRY: Shows the player's current value of
pw_carry. - AIR: Shows both underwater and space countdown timers (
pw_underwaterandpw_spacetime), showing how many tics the player has left to survive before drowning/suffocating. When the player is neither underwater or in space, they will both be 0. These are displayed as such: underwater, spacetime - ABILITY: Shows the player's primary and secondary abilities.
- ACTIONSPD: Shows the player's current
actionspd. - PEEL: Shows the player's current
dashmode. - SCOREADD: Shows the player's current
scoreadd.
- PF/SF: Shows which of the player's
pflagsandcharflagsare currently turned on. Each flag is represented with a piece of colored text that turns green when on and red when off:- SJ:
PF_STARTJUMP - JD:
PF_JUMPED - ND:
PF_NOJUMPDAMAGE - SP:
PF_SPINNING - ST:
PF_STARTDASH - TH:
PF_THOKKED - SH:
PF_SHIELDABILITY - GL:
PF_GLIDING - BO:
PF_BOUNCING - SL:
PF_SLIDING - AA:
PF_APPLYAUTOBRAKE - SU:
SF_SUPER - *G:
PF_GODMODE - *C:
PF_NOCLIP - *I:
PF_INVIS
- SJ:
- DRAWANGLE: Shows the player's current
drawanglein degrees.
Randomiser
- Init: Shows the initial random seed value, in hexadecimal form.
- Seed: Shows the current random seed value, in hexadecimal form.
- ==: Shows the next
P_RandomFixedoutput value, converted to a decimal number between 0 and 1, that would be given with the current random seed value.
Memory
- Heap used: Shows the total heap memory used, in KB.
Automap

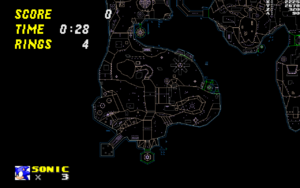
Pressing the Tab key while in development mode will show the automap, which is a map of the level as viewed from above. This feature is retained from Doom, where it was a regular game feature that could be used in normal gameplay. However, since SRB2's map layouts are largely straightforward and exploration is rewarded with hidden items, the automap feature can only be activated via development mode. Unlike in Doom, the full map is shown even if the player has not visited certain areas yet.
Key
The automap displays Objects and linedefs in the map in a variety of colors to highlight what they are exactly:
| Map items | Displayed as |
|---|---|
| Objects |
|
| One-sided linedefs |
|
| Two-sided linedefs |
|
| Two-sided linedefs w/ differing ceiling heights |
|
| Two-sided linedefs w/ differing floor heights |
|
| "Thok barrier" linedefs (two-sided linedefs w/ height 0 on one side) |
|
Controls
Several keys perform actions inside the automap:
| Key | Action |
|---|---|
| Tab | Toggles on/off the automap: if in normal view, start up the automap; if not, exit the automap and return to normal view. |
| Arrow keys | If follow mode is off, these can be used to move the portion of the map viewed with the automap. Otherwise, these do nothing. |
| F | Toggles follow mode, which is enabled by default. If follow mode is on, the map is centered on the player and moves with them; if it is off, the arrow keys can be used to move the portion of the map viewed with the automap separately from the player itself, though this doesn't necessarily stop the player from moving. |
| G | Toggles grid lines. |
| = | Zooms in. |
| - | Zooms out. |
| 0 | Toggles between the current zoom level being used and the maximum limit for zooming out. |
If one of these keys has also been mapped to a gameplay function (e.g., running or jumping), the above table overrides that key's default behavior during automap mode. All other keys can be used as normal, however.
NiGHTS development mode

As NiGHTS Super Sonic, development mode (with the "NiGHTS" flag set) illustrates the behavior of transferring Axes. It displays the Axis Transfers as the game interprets them, a wall starting at the center of the Axis that Super Sonic breaks off, and stretching infinitely through the point of the relevant Axis Transfer. Crossing the wall registers the Axis Transfer. Transferring Axes will cause "TRANSFER!" to be displayed in the center of the screen as well. The player actually gets hurt by the visual cue of the wall created by development mode, so it is recommended to activate God mode in this situation.
