Linedef executor tutorial
Linedef executors are SRB2's method for scripting interactive events. They consist of three parts: a trigger sector, a trigger linedef and one or more commands (also called executors). When the trigger sector is touched, the trigger linedef is called and triggers all the executor linedefs that are located in the sector it is in. This tutorial will teach you the concept of linedef executors with the example of a button that opens a door when pressed.
In-level setup
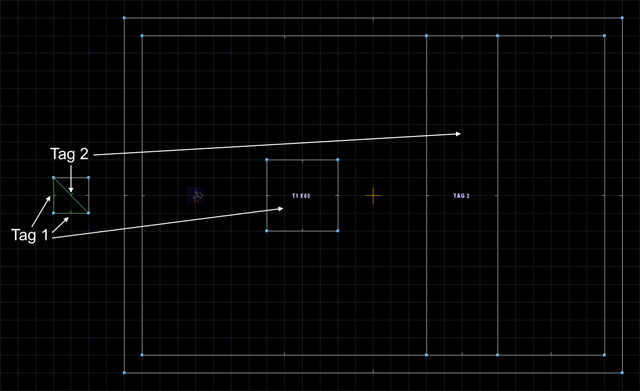
First, set up a room like in the image below. The small square is the button that will open the door (it should be raised above the rest of the room) and should have a tag of 1. The sector on the right of the room is the door. It should have a tag of 2 and its floor and ceiling should have the same height as the floor of the regular room.
The control sector on the left is made of two triangles joined at one line. Note the direction the middle linedef is pointing. It's facing away from the two linedefs with tag 1. The sector with the tag 1 linedefs should have its floor set to the same height as the floor in the room, and the other control sector should have its ceiling set to the same height as the ceiling in the room. These heights will later be used to raise the door to the ceiling and lower the button to the floor.

Control sector setup
Trigger
To set up the linedef executor's trigger, there are two steps:
- First, we need to make a trigger linedef in the control sector. Select one of the linedefs in the lower control sector (but not the middle one) and give it the linedef type 302, Trigger Linedef Executor (Once). Make sure this linedef is set to tag 1. This is the trigger linedef. When activated, it will go through all the linedefs that belong to the lower control sector (even the one that is facing away from it) and run any linedef executors attached to them. Since we set the type to "Once", it will only activate the linedef executors the first time it is triggered.
- Now we need to make a trigger sector that activates the trigger linedef. Select the button sector and give it the sector type Trigger Linedef Executor (Floor Touch). Make sure this sector is also set to tag 1. Since this sector is tagged to the trigger linedef, the trigger linedef will activate when the player touches the floor of this sector.
Commands
Now that we have the trigger set up, we need to set up the two commands that lower the button and raise the door:
- Select the other linedef in the lower control sector (but again not the middle one) and give it the linedef type 403, Move Tagged Sector's Floor. Make sure this linedef is set to tag 1. This command will move the floor of the button sector (which has tag 1 too) to the floor height specified by its front sector. The front sector of a linedef is the one that the notch in its middle is facing to. In our case, the linedef is facing the lower control sector and we set the floor height of that to the floor height of the in-level room. That means that once the trigger is activated, the button will be lowered to the floor.
- Now select the middle linedef that is part of both control sectors and give it the linedef type 404, Move Tagged Sector's Ceiling. Make sure this linedef is set to tag 2. This command will raise the ceiling of the door sector (which has tag 2 too) all the way to the ceiling of the front sector of the linedef, thus opening the door. Notice that the front sector is in this case the upper control sector. That means that we triggered the linedef executor from its back sector, but it gets its parameters from its front sector. This would allow us to give the back sector any ceiling height we want; the linedef wouldn't be affected by it but still be activated.
Now put a Player 1 Start next to the button and try it out. If you tagged everything correctly and put the sector type on the button, stepping on the button should open the door and lower the button.
Notes
- The same setup as shown above can be used for any triggers or commands. All the commands on the same sector as the trigger linedef will be run at the same time when the trigger sector is touched. Since the linedef executors might need some additional parameters, the shape of the control sectors might look different, but the concept is the same. The sector effect controls when the linedef executors are triggered, the trigger linedef controls how often the linedef executors are triggered and who can trigger it, and the commands controls what happens. In this case, the button is lowered and the door is opened once when any player touches the floor of the trigger sector. You could, for example, trigger effects only when a character with a specific ability touches the air of the trigger sector, and activate each time that happens. The choice is up to the level designer.
- Note that the linedef executors get their information from the sector to their front, where the little notch is displayed on the linedef in the editor. In this case we don't actually need two control sectors, because we don't need different values for each linedef executor. We could have just set the ceiling and floor to the values we need in one sector, since both are only used by one linedef anyway. For more complicated situations, multiple sectors become absolutely necessary. Take notice that you can still trigger a linedef executor from its back sector, even if it uses the values of its front sector.
Sample
- Example file: ldexecex.wad (MAP01)
| How to use |
|---|
|
